

Ldap error invalid credentials error code 49
This forum has migrated to Microsoft Q&A. Visit Microsoft Q&A to post new questions.
Question
We are developing a LDAP authentication against Active Directory, we met the follow errors, although the username and password are correct.
LDAP: error code 49 — 80090308: LdapErr: DSID-0C090334, comment: AcceptSecurityContext error, data 52e, vece
The user detail is: CN=Peter, Lia ,OU=DEV,OU=HK_U,OU=cita,OU=US,DC=achtest,DC=local
As you may saw, the last name of this user has a backslash, plus a space in CN, we guess it may be the problem, since other users don’t have this problem if the last name of users don’t have a backslash and a space.
However we don’t know how we can add a new user to duplicate this issue, since it’s not way to add a new user with space in the end of name, the Active Directory will auto trim the space when system save the new user to database.
My questions are:
1. Do you have this kind of experience? Any idea to resolve?
2. How we can add a new user with a space in the end of last name? and then we can replicate this issue again?
Источник
Как избежать ошибок при составлении и отправке писем
Причинами возникновения ошибок и, как следствие, неполучения сообщений могут служить разные факторы. Одни из них связаны с неправильным составлением исходящих писем самим пользователем, другие относятся к более глобальным программным настройкам со стороны получателя.
Самый простой способ это понять – отправить тестовое сообщение на свой ящик. Затем следует протестировать его отправку и получение, используя разные внешние почтовые сервисы: gmail, yandex, mail, rambler и другие. Если сообщение получено, следует ответить на него, проверив корректность исполнения команды «RE» вашим почтовым сервером и принятие ответа условным отправителем.
Довольно часто проблемы с попаданием писем в папку «Спам» или программной блокировкой на стороне получателя лежат в неверном оформлении ключевых полей. Особенно это касается массовых рассылок коммерческого характера. Для отправки большого количества однотипных сообщений как минимум потребуется выполнение следующих параметров настройки:
Некорректное использование бота для отправки писем может привести к блокировке отправителя и другим нежелательным последствиям. Даже если информация, которую вы отправляете потенциальным клиентам, реально интересна им, система спам-фильтрации может воспринять данную рассылку как вредоносную. Чтобы избежать этого, лучше всего воспользоваться услугами специализированных компаний.
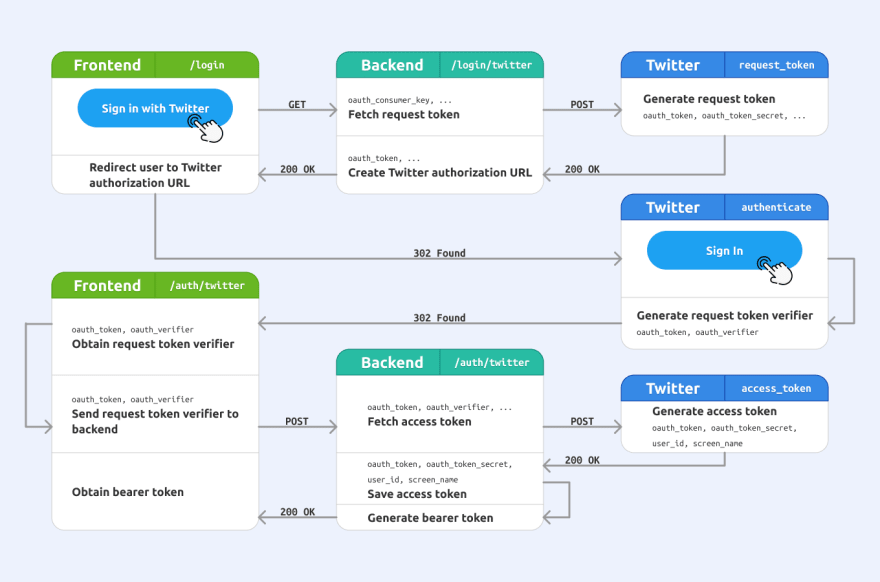
Bearer authentication and user information
With the presence of a valid access token, the user is logged in and each subsequent request will include the JWT giving him access to every resource permitted with the JWT.
For every HTTP call, the request must include a “header” named “Authorization” with a value starting with “Bearer” and followed by the token:
It is called a bearer authentication in the sense that it means “give access to the bearer of this token”.
The OpenID Connect protocol enriches the OAuth protocol in multiple ways including the addition of an endpoint to retrieve user information. The user information endpoint can be obtained from the Well-known URI Discovery endpoint and equals to in our case.
The command contacts the Authorization Server and returns the user information:
It takes the user information endpoint and the access_token to succeed:
Prints on success:
Prints on error something like:
Why does Epic Games say my credentials are invalid?
Epic Games may say that your credentials are invalid if the information you provided does not match what is currently stored in their system, or if your account has been temporarily disabled. If you believe that you are entering correct information and are still receiving an “invalid credentials” message, it is advised to contact Epic Games customer service to check on the status of your account.
Additionally, if you have recently changed your password, you may need to update the stored information in Epic Games so it matches what you have now.
Why does it keep saying invalid credentials?
Invalid credentials usually occurs when the username and password entered do not match what is registered in the system. This could be due to a variety of reasons, such as mistyping the credentials, not having an active account, an incorrect password reset, or an account that has been locked due to too many failed attempts.
It is important to ensure that the information entered is accurate and up-to-date. Checking for typos or making sure the account is active can often help resolve this issue. Additionally, you may need to contact the site’s customer service or technical support team for further assistance.
When to use Oauth2
In the previous post we created public API key credentials we looked at the difference between public and private data. We used an API key to access public data.
Now its time to look at one of the ways to access private data.
If your application needs to access a users Google drive data then you will need to ask there permission to access it. If you want to be able to upload videos to a users YouTube account you will need there permission and use Oauth2.
What Oauth isnt
Before Oauth we are talking pre 2006 if you wanted to access an API on behalf of a user, the user had to give you there login and password. We would send requests something like.
While this worked fine it wasn’t exactly secure was it. If I wanted to grant a third party application access to my twitter account I had to give them my twitter login and password. The third party application would then have full access to my twitter account, and there was really no way for twitter to even know that it wasn’t me. Also what happens in 6 months when I change my password? When I changed my password the third party application will no longer work unless I remember to give them the new password. Using a login and password to access data though an API was called client login.
A CLI application to test the flow
I have created a small Node.js CLI application published on GitHub and NPM. It reproduces manually each steps of the authentication process. To each step corresponds a Node.js module inside the “lib” folder and named with an incremental number.
You can run the overall application with the command . It prints:
Note, it implies that Node.js is installed on your system. Every Node.js installation come with the , and commands. is a tool to execute node.js packages.
As you can see, they are 5 available commands, beside , which are:
- : step 1 — URL generation
- : step 2 — authorization code grant
- : step 3 — refresh token grant
- : step 4 — user info
- : step 5 — JWT verify
To each command corresonds a Node.js module. For example, the command is implemented inside the file. It can also be execute individually by cloning the repository and running inside it. By the way, it is 2020 and I still enjoy writing CoffeeScript. It is clean, simple and expressive.
Each module is constructured with the same pattern. They define a configuration which describes the CLI application. The configuration consist of descriptions, list of options, as well as functions.
The functions are were the work is happening and this is what has been imported as code illustration inside this article.
Client Credentials Grant Type
The first OAuth grant type is called Client Credentials, which is the simplest
of all the types. It involves only two parties, the client and the server.
For us, this is our command-line script and the COOP API.
Using this grant type, there is no «user», and the access token we get will
only let us access resources under the control of the application. When we
make API requests using this access token, it’s almost like we’re logging in
as the application itself, not any individual user. I’ll explain more in a second.
If you visit the application you created earlier, you’ll see a nice
«Generate a Token» link that when clicked will fetch one. Behind the scenes,
this uses client credentials, which we’ll see more closely in a second.
But for now, we can celebrate by using this token immediately to take actions
on behalf of the application!
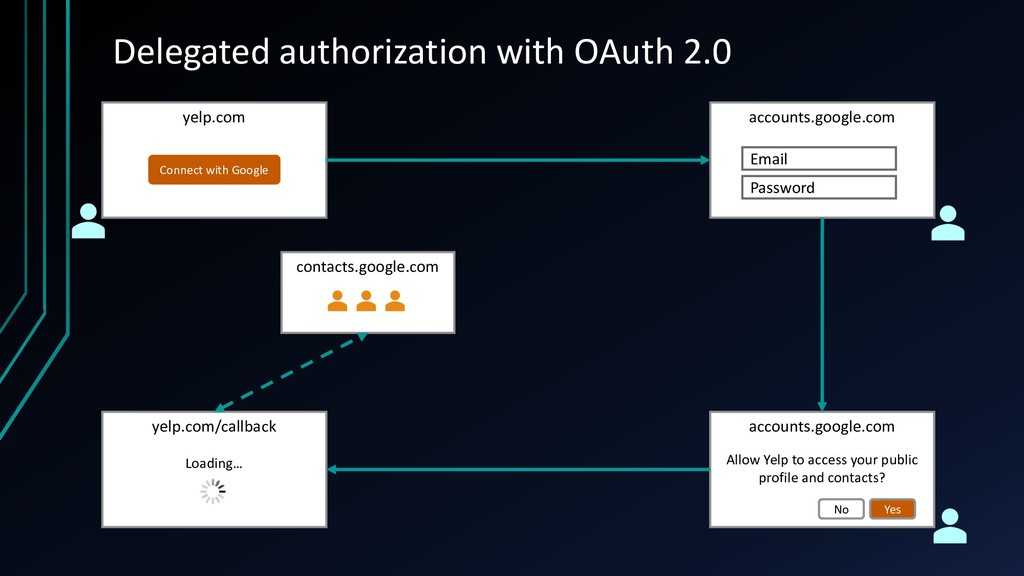
What Is Authorization?
Authorization is the process of limiting access to an application based on the user’s role. Based on their privileges, you grant different access levels to these roles in the application.
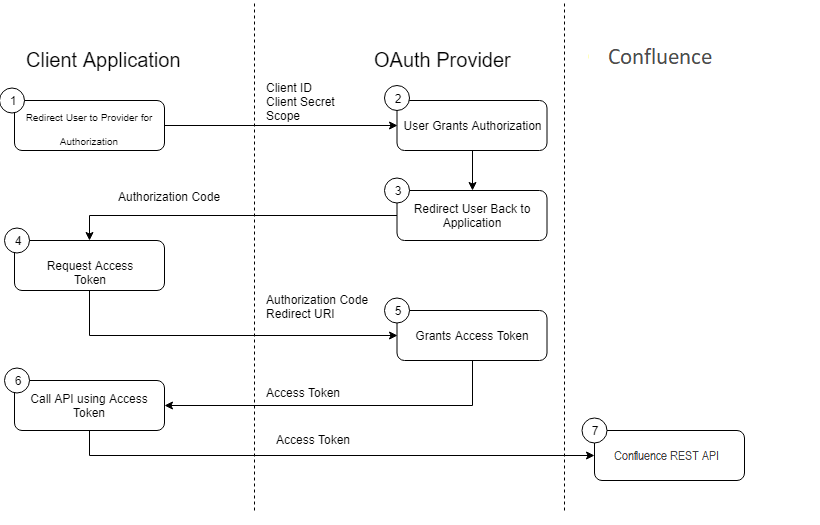
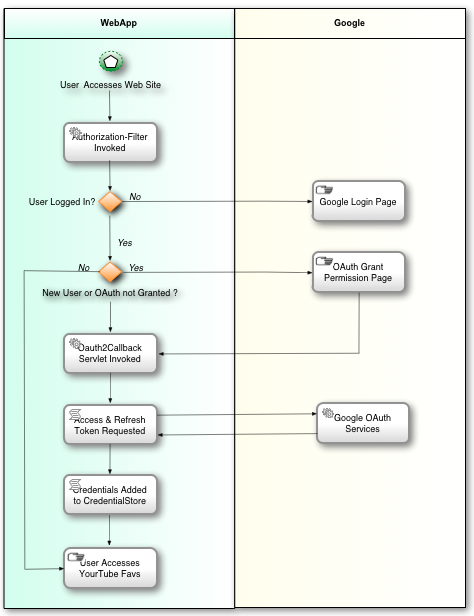
Let’s look at how a typical authorization flow works in practice. The user clicks on a link or receives an authentication prompt, asking the user for permission to build an app that can access the service provided by Google (for example). The app requesting permission produces a unique string of characters (typically referred to as OAuth_Redirect_URL) and then presents the string to the service provider for approval of the request. This is when the user can review what the app will be able to access and decide whether or not to allow it to proceed. Once approved, Google redirects to the OAuth_Redirect_URL string and passes along an access token tied specifically to the requesting application (in our Node.js web app).
For this article, we’ll take advantage of Google’s OAuth 2.0, which lets you offload this task for your end users and lets them log in only once with their Google account.
Resolving the error
Now that you know the cause of the HTTP 401.3 status code, do the following to fix the error:
If you are using a custom username as the application pool identity, make sure that the user has read and execute permissions on the website’s root directory.
![]()
Ensuring that the custom application pool user has read and execute permissions on the root directory
If you’re using the default ApplicationPoolIdentity for your application pool, make sure that the built-in IUSR user or IIS_IUSRS group has exactly the same permissions as shown in the screenshot below.
![]()
Ensuring that the default application pool identity has read and execute permissions on the root directory
If the error persists, edit the Anonymous Authentication setting of your website, as explained in the How IIS authentication works section. Be sure it is set to use the Application pool identity. See the following screenshot for reference:


![]()
Modifying the anonymous authentication identity to match the application pool identity in IIS
How do I find my Windows credentials password?
Click on the Control Panel. Go to User Accounts. Click on Manage your network passwords on the left. You should find your credentials here!
How do I access Oracle Application Express?
Before You Begin. Accessing Oracle Application Express from the Database Home Page….The Login page appears.
- On the Login page: Username – Enter admin.
- If prompted, change your password and click Apply Changes.
- Enter you new login credentials and click Login. Oracle Application Express Administration Services appears.
How do I fix error ORA 01017?
There are a few ways to resolve the ORA-01017 error:
- Check the username and password are correct.
- Oracle 11g passwords are case sensitive, so ensure that your connection string caters for this.
- Check the database link setup if you’re using a database link.
How do I clear invalid credentials?
If you are facing login problem repeatedly. Please clear the cache in the browser and continue. If you facing problem while loading login page or while login please clear your browser cookies. NIC (National Informatics Centre) recommended following solution for “ invalid login credential” error.
What to do if your login credentials are invalid?
The credentials you entered for logging in to Oracle ERP Cloud were rejected. Remediation: Verify your login credentials by logging in to the dedicated Oracle CASB Cloud Service user account created in Oracle ERP Cloud in a separate browser window. Then carefully enter the valid login credentials to register your Oracle ERP Cloud instance.
How can I solve philhealth invalid login credentials?
If you are encountering invalid login credentials when attempting to access the online services of the Philippine Health Insurance Corporation (PhilHealth), you may try the following steps to resolve the issue:
1. Double-check your username and password. Ensure that you are entering your credentials correctly, as incorrect entries can result in invalid login credentials.
2. Reset your PhilHealth credentials. If you have forgotten your username and/or password, you can reset your credentials on the PhilHealth website.
3. Clear your browser’s cache and cookies. An outdated version of your browser’s cache and cookies may cause invalid login credentials.
4. Update your browser. Be sure to download and install the most recent version of your preferred Web browser in order to have the latest features and security fixes.
5. Contact PhilHealth Customer Support. If the invalid login credentials persist after trying the above steps, contact the PhilHealth Customer Care Hotline (02) 441-7442 or the PhilHealth Online Skin Care Hotline (02) 988-1000 to speak with a representative and inquire further.
Interesting Details
Access Tokens normally have a maximum size of 2,048 bytes. However, tokens issued by Token Security Service can be up to 12,288 bytes. [].
There are two types of service account JSON files:
- Type: authorized_user. This type is created by the CLI command gcloud auth application-default login. This type is similar to OAuth Client Secrets and includes the Client ID, Client Secret, and a Refresh Token. I believe, but I have not verified, that it would be easy to create tokens with this file.
- Type: service_account. This type is the normal service account JSON key file that you create and download from the Google Cloud Console or create with the CLI. This type includes the service account RSA private key.
Причины возникновения
Когда пользователь пытается войти в свою учетную запись на веб-сайте или в приложении, система проверяет введенные данные на соответствие с сохраненными в базе данных информацией. Если введенные данные не совпадают с сохраненными, система считает их неправильными и выводит сообщение об ошибке входа. Существует несколько причин, по которым возникают неправильные учетные данные для входа:
1. Ошибки при вводе: это может быть опечатка или неправильное написание логина или пароля пользователем. Такие ошибки могут возникать, когда пользователь пытается ввести данные на мобильном устройстве с маленьким экраном или с клавиатурой, на которой легко случайно нажать на неправильную кнопку.
2. Забытый пароль: пользователь может не помнить свой пароль, особенно если он редко использует учетную запись. В таком случае они могут попытаться использовать старый пароль или попытаться восстановить доступ к учетной записи через процедуру сброса пароля.
3. Аккаунт был заблокирован: если пользователь неправильно вводит свои учетные данные несколько раз подряд, система может заблокировать его учетную запись из-за подозрений в несанкционированном доступе или нарушении безопасности. В таком случае пользователь должен обратиться в службу поддержки для разблокировки учетной записи.
4. Учетная запись была удалена: если пользователь ранее удалил свою учетную запись, он не сможет использовать ее данные для входа.
Из-за перечисленных причин возникают неправильные учетные данные для входа
Важно убедиться, что пользователь правильно вводит свои данные и имеет доступ к своей учетной записи
Положительные и отрицательные сообщения SMTP-сервера
Данные коды являются трехзначными, каждая его часть несет в себе определенную информацию, расшифровывающую причину сбоя.
Первая цифра комбинации содержит информацию о качестве доставки:
Существует четыре варианта значений для первой цифры кода:
Вторая цифра в коде сообщает о категории ответа:
Третья цифра дает более расширенную информацию о значении, указанном во второй цифре SMTP-ответа.
Помимо цифровой комбинации, SMTP-сообщение может содержать дополнительную текстовую информацию.
Полную информацию о кодах, их компоновке и значениях можно найти в спецификациях RFC 5321 и RFC 1893.
Причина этой ошибки Outlook 0x800cccdd
Как мы знаем, IMAP автоматически координируется с сервером, поэтому нет никаких требований для планирования отправки и получения электронных писем, поскольку он по умолчанию делает это автоматически. Поэтому, когда мы включаем опцию, это приводит к ошибке. Пользователь обычно объединяет учетные записи POP и IMAP в одну группу, поэтому возникает ошибка порта 143/993 протокола IMAP с кодом 0x800cccdd.
Сообщения об ошибках при возникновении ошибки Outlook IMAP 0x800cccdd
Хотя необязательно, чтобы пользователь получал те же сообщения, что и у Outlook во многих версиях, поэтому сообщения могут немного отличаться. Здесь упомянуты общие, и порт может быть как 143, так и 993.
«Ваш сервер IMAP закрыл соединение».
«Соединение слишком долго простаивает».
Как исправить код ошибки IMAP 0x800cccdd
Самое простое решение – отключить планирование отправки / получения. Где взять такую опцию?Выполните указанные ниже действия, чтобы отключить эту опцию в Microsoft Outlook 2016.
Шаг 1: Нажмите кнопку «Отправить / получить» на панели инструментов.
Шаг 2: Теперь перейдите к определению групп отправки / получения.
Шаг 3: Откроется окно «Группы отправки / получения».
Шаг 4: Отключите отправку / получение каждые _ минут.
Шаг 5: В итоге настройки будут такими.
Это все, что вам нужно было сделать, чтобы исправить ошибку Microsoft Outlook 0x800cccdd. Упомянутые здесь шаги относятся к Outlook 2016, хотя каждый пользователь Outlook должен делать одно и то же, в разных версиях Outlook не будет большой разницы (найдите инструменты или параметры файла для кнопки отправки / получения).
Вывод
Это ошибка 0x800cccdd «ваш IMAP-сервер закрыл соединение с Outlook», которая может быть очень легко решена и может случиться с любым, кто использует Microsoft Outlook. Упомянутые шаги имеют высокую вероятность решить ошибку Microsoft Outlook 0x800cccdd, с которой сталкивается пользователь.
What is Oauth2?
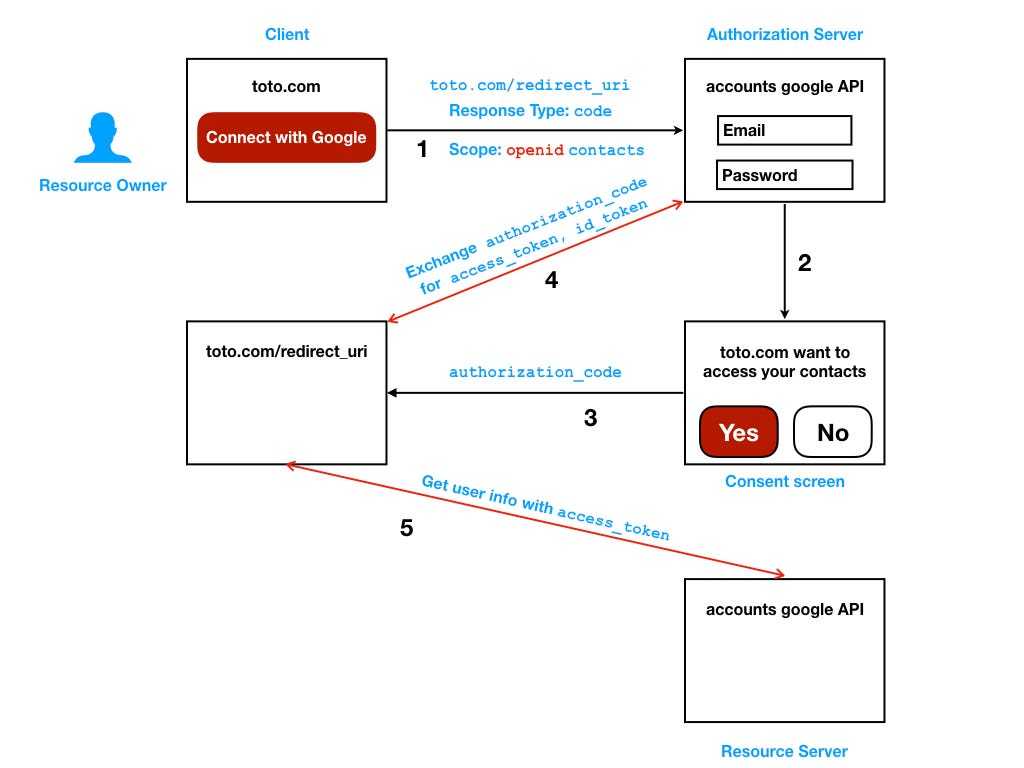
I am sure you have seen this window before. This is simply OAuth2 in action.
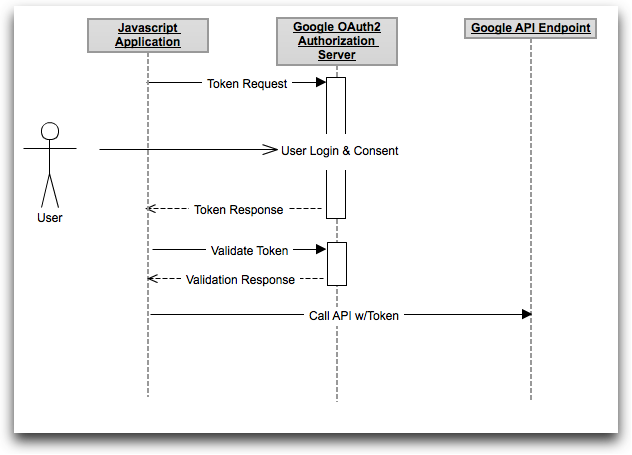
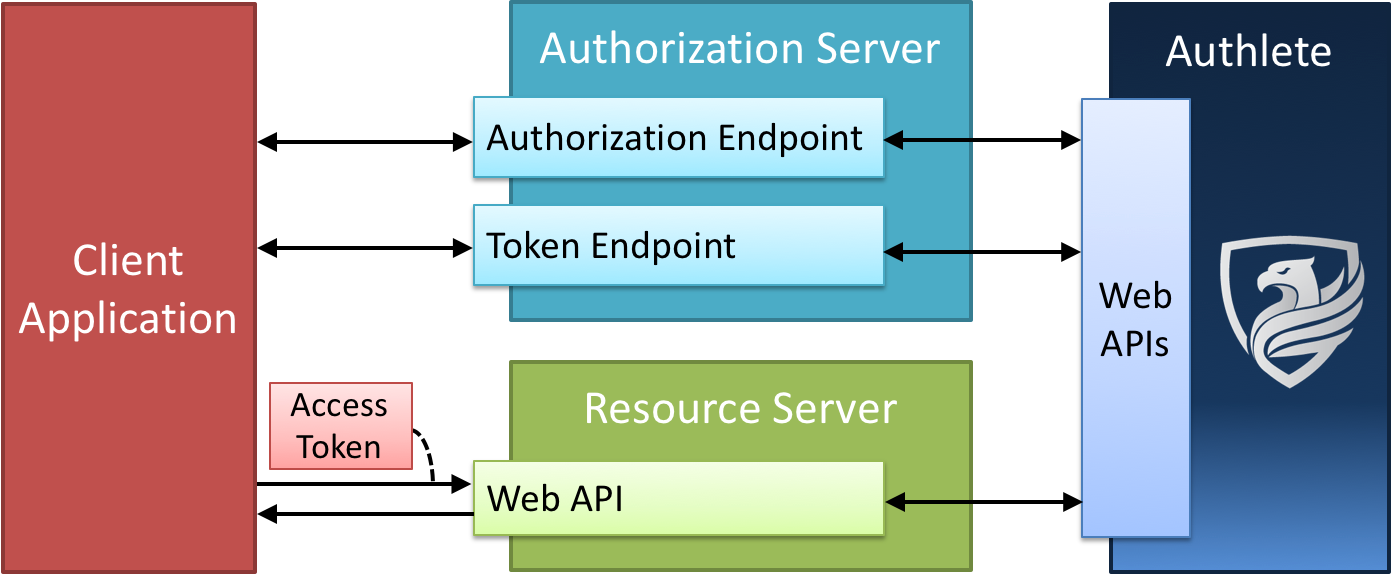
Google APIs use the OAuth 2.0 protocol for authentication and authorization. Google supports common OAuth 2.0 scenarios such as those for web server, installed, and client-side applications.
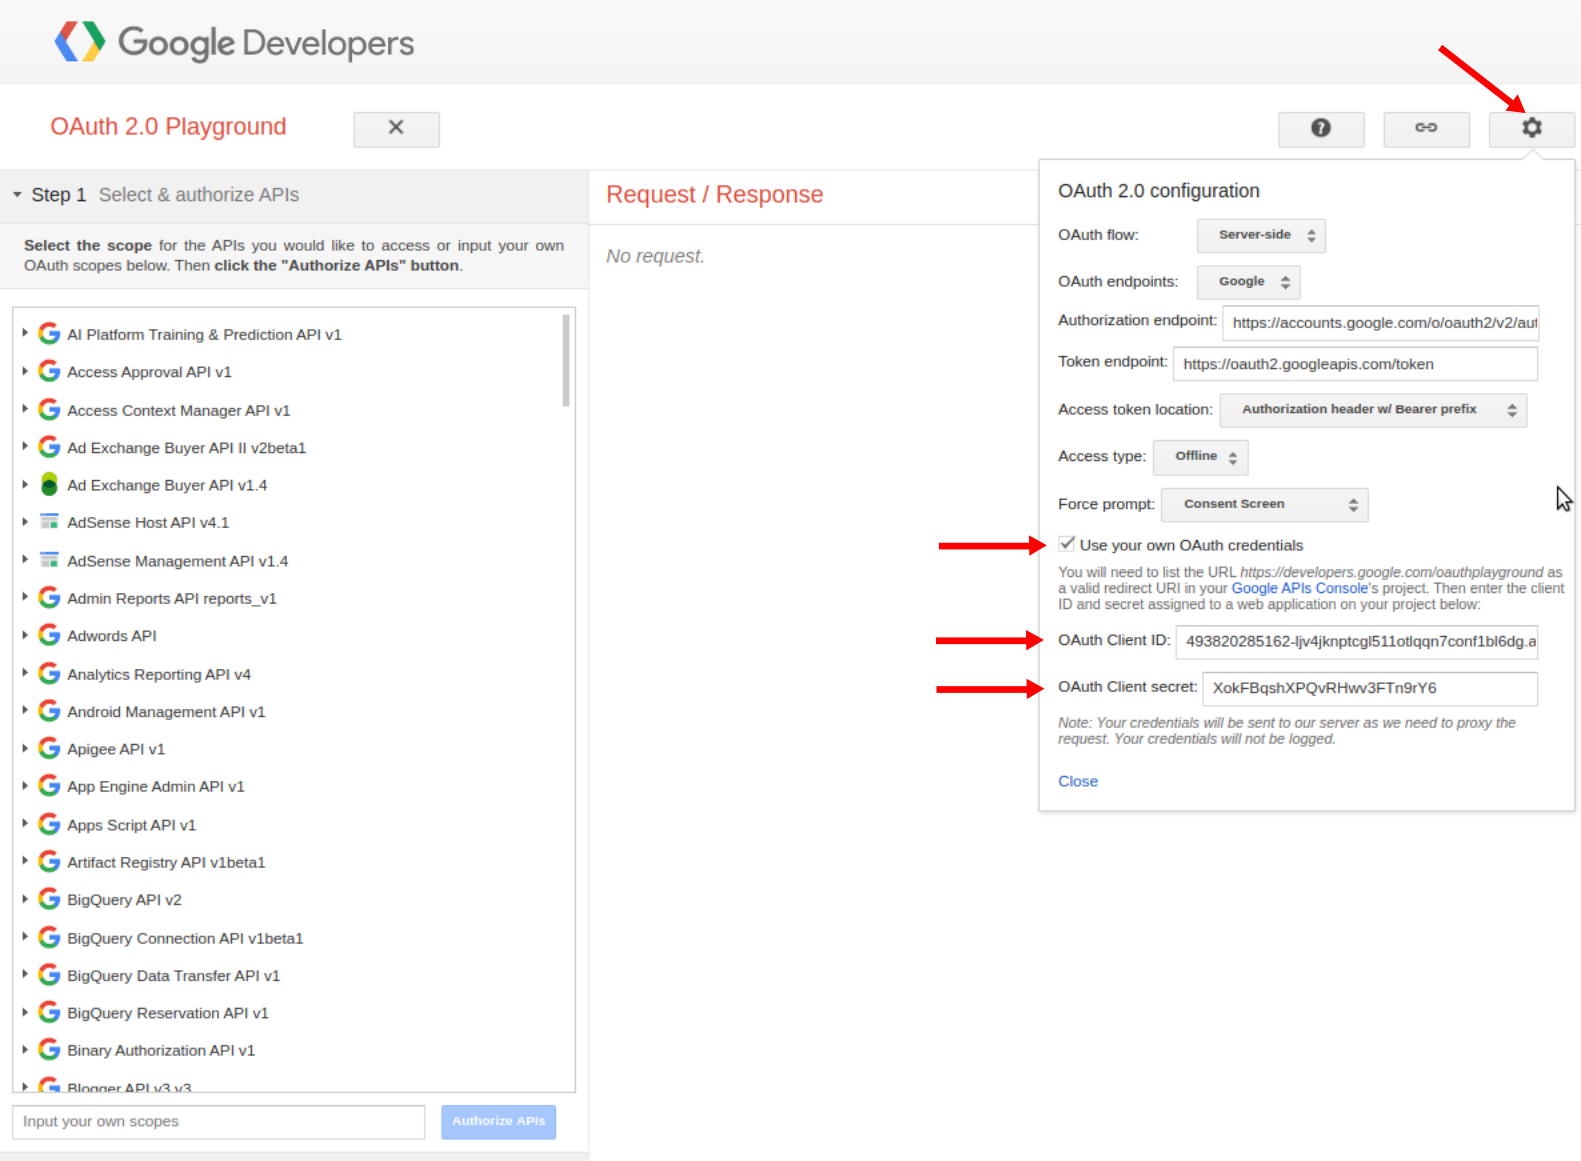
To begin, obtain OAuth 2.0 client credentials from the Google Developers Console. Then your client application requests an access token from the Google Authorization Server, extracts a token from the response, and sends the token to the Google API that you want to access. For an interactive demonstration of using OAuth 2.0 with Google (including the option to use your own client credentials), experiment with the OAuth 2.0 Playground.
Oh my did I just copy that from the Using OAuth 2.0 to Access Google APIs sorry but it needed to be done. Now Let me try and explain what it says in ungeek English.
Open authentication comes in three steps.
- The consent screen request access from the user. (the picture above)
- Server returns an authentication code
- Exchange the authentication code for access.
There is also a forth step where we refresh access after it has expired.
3-legged Oauth2 code
The code used to authenticate using Oauth2 is slightly technical but you are in luck I have a post for that as well. In my Google 3 legged Oauth2 post I show you each of the steps in how to get access to Google using Oauth2 with simple HTTP Post and HTTP Gets. I strongly recommend you use one of Googles client libraries and not code all this yourself but if you need to it can be done.


Проверить подключение к серверу
Если вы столкнулись с ошибкой 28 при попытке подключиться к серверу по протоколу IMAP, первым делом стоит проверить подключение к серверу. Возможно, проблема заключается в недоступности сервера или неправильно указанных учетных данных.
Для проверки подключения к серверу выполните следующие действия:
1.
Убедитесь, что у вас есть подключение к интернету. Проверьте, работает ли ваше подключение и есть ли доступ к другим веб-сайтам.
2.
Проверьте правильность указанных учетных данных. Убедитесь, что вы правильно ввели адрес электронной почты и пароль
Обратите внимание на регистр символов, так как пароли чувствительны к регистру.
3.
Проверьте настройки IMAP-сервера. Убедитесь, что вы используете правильный порт и протокол для подключения к серверу
Обратитесь к провайдеру услуг электронной почты для получения правильных настроек.
4.
Попробуйте временно отключить антивирусное или брандмауэрное программное обеспечение на вашем компьютере. Некоторые антивирусные программы или брандмауэры могут блокировать соединение с IMAP-сервером.
5.
Проверьте, что сервер IMAP работает и доступен. Если сервер IMAP не работает, попробуйте подключиться позднее или свяжитесь с администратором почтового сервера.
Если после выполнения всех вышеперечисленных действий проблема не устраняется, возможно, проблема заключается не в подключении к серверу. В таком случае рекомендуется связаться с технической поддержкой вашего почтового провайдера для получения дополнительной помощи.
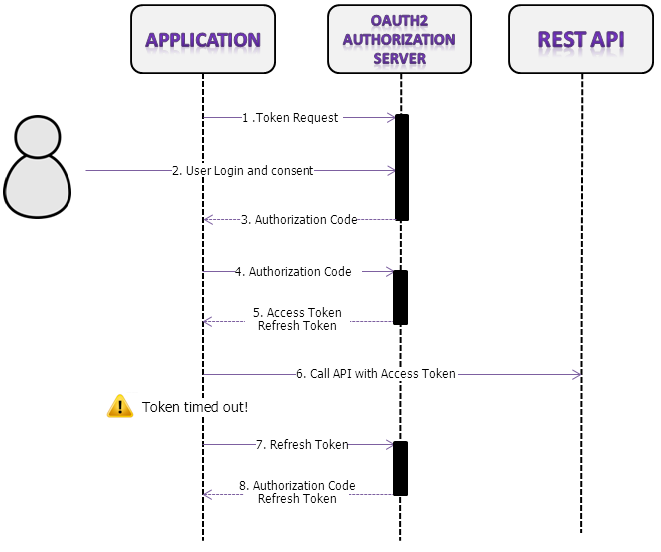
Refresh token
The access token is the only token which shall be sent to the API when submitting authenticated requests. You shall never share the refresh and ID token.
The access token has a short period of validity. If you do not want your users to log in frequently, you must return the refresh token with the scope.
Requesting a new token is a matter of sending the right POST request.
It takes the client ID, the client secret unless using the PKCE flow and the user refresh token:
Like previously when using the Authorization Code, the result is:
The refresh token is a Nonce (No More than Once). Attempting to reuse it will result in:
You must reuse the refresh token generated by the last call. Rotating refresh token on the public client ensures both the access and refresh token are only valid for a relatively short period time, thus reducing the surface of attack in case of corruption.
Part II: Using OAuth to Access Google’s APIs
To see how OAuth actually works in practice, I have built a simple project, . It is deployed here: https://octopus.otee.dev/. It does just one thing: allows users to log-in using their Google accounts. If successful, the profile photo and name of the user is displayed.
Goal
The goal of this project: to leverage Google’s authorization server, to
- Authenticate users: By doing this, we do not need to maintain a database to store users of the application (and their credentials)
- Access users’ information from Google: Using OAuth, we can access necessary information of users from the relevant resource server
Once access tokens and refresh tokens are generated, they are sent back to the user, as cookies. Thus, for subsequent requests by the same user, we rely on their cookies, to make requests with Google’s API.
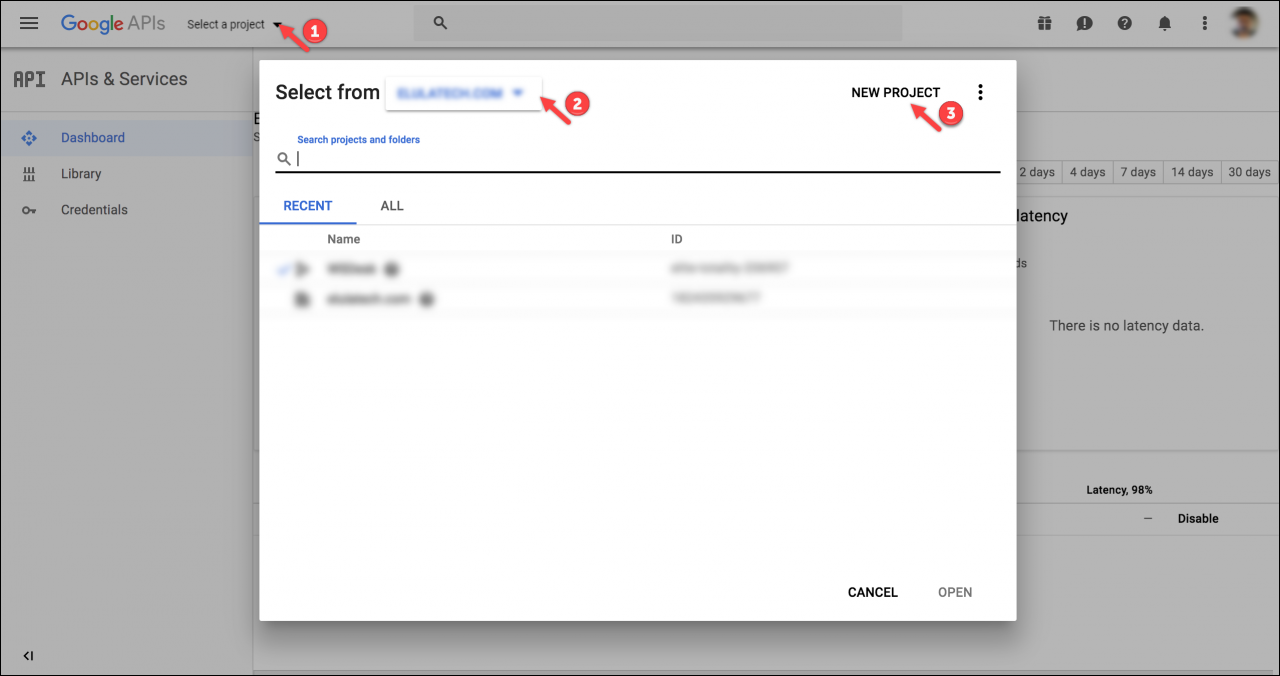
Obtain Client Credentials
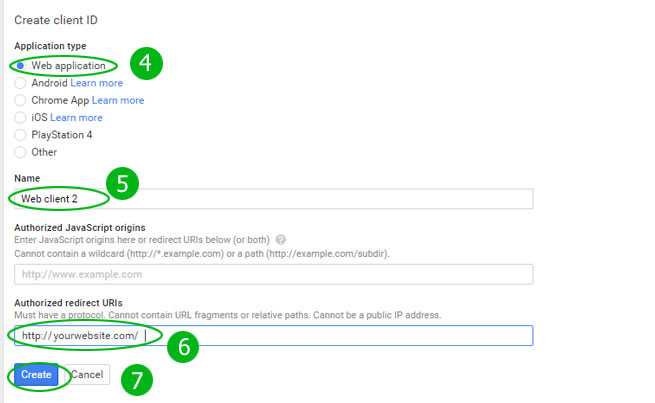
First, we must register our client application and generate the client ID and client secret. This is done by visiting the ‘Credentials’ tab on the Google API Console. We also set the redirect URL(s) of our app.
Create an Authorization Request
The next step is to create an authorization request. The authorization end-point for Google’s authorization server is: . The request sent to this end-point should contain certain parameters (called ‘authorization parameters’), that can identify the client application (using the Client ID), specify the redirect URL, the scope of access etc.
Redirect the User to the Authorization End-Point
When the user needs to log-in, our app will redirect the user to the authorization end-point, by sending the authorization request created above. Here’s the authorization request created by :
Google Seeks User Consent
Once Google’s authorization server receives the authorization request, it authenticates the user and displays a consent window showing the name of the application and the scopes of access requested. Here’s the consent window displayed for :
![]()
Redirection to Client’s Redirect URL
Once the user provides their consent, the authorization server redirects the user to the redirect URL of our app along with the authorization code. Here’s how the request to the redirection endpoint is generated by the authorization server:
Request for Access Tokens
Once our app receives the authorization code (at the redirection URL), it generates a request to the token end-point of the authorization server, namely . This should be a request accompanied with certain parameters that authenticates our app (client ID and client secret), discloses the authorization code, specifies the redirect URL, etc. Here’s how the generates a request for receiving access tokens:
Response with Access and Refresh Tokens
Google’s Authorization server responds with a JSON containing access and refresh tokens. Here’s an example of a JSON returned by the Authorization server:
Making API Calls
Now that we have the access token, we can make requests with Google’s resource server which hosts the resource we need. In the case of , the resource server end-point is . When we send a request with valid tokens, we get a response payload carrying essential details about the user:
Using this response, we can display the user’s name and image:
![]()
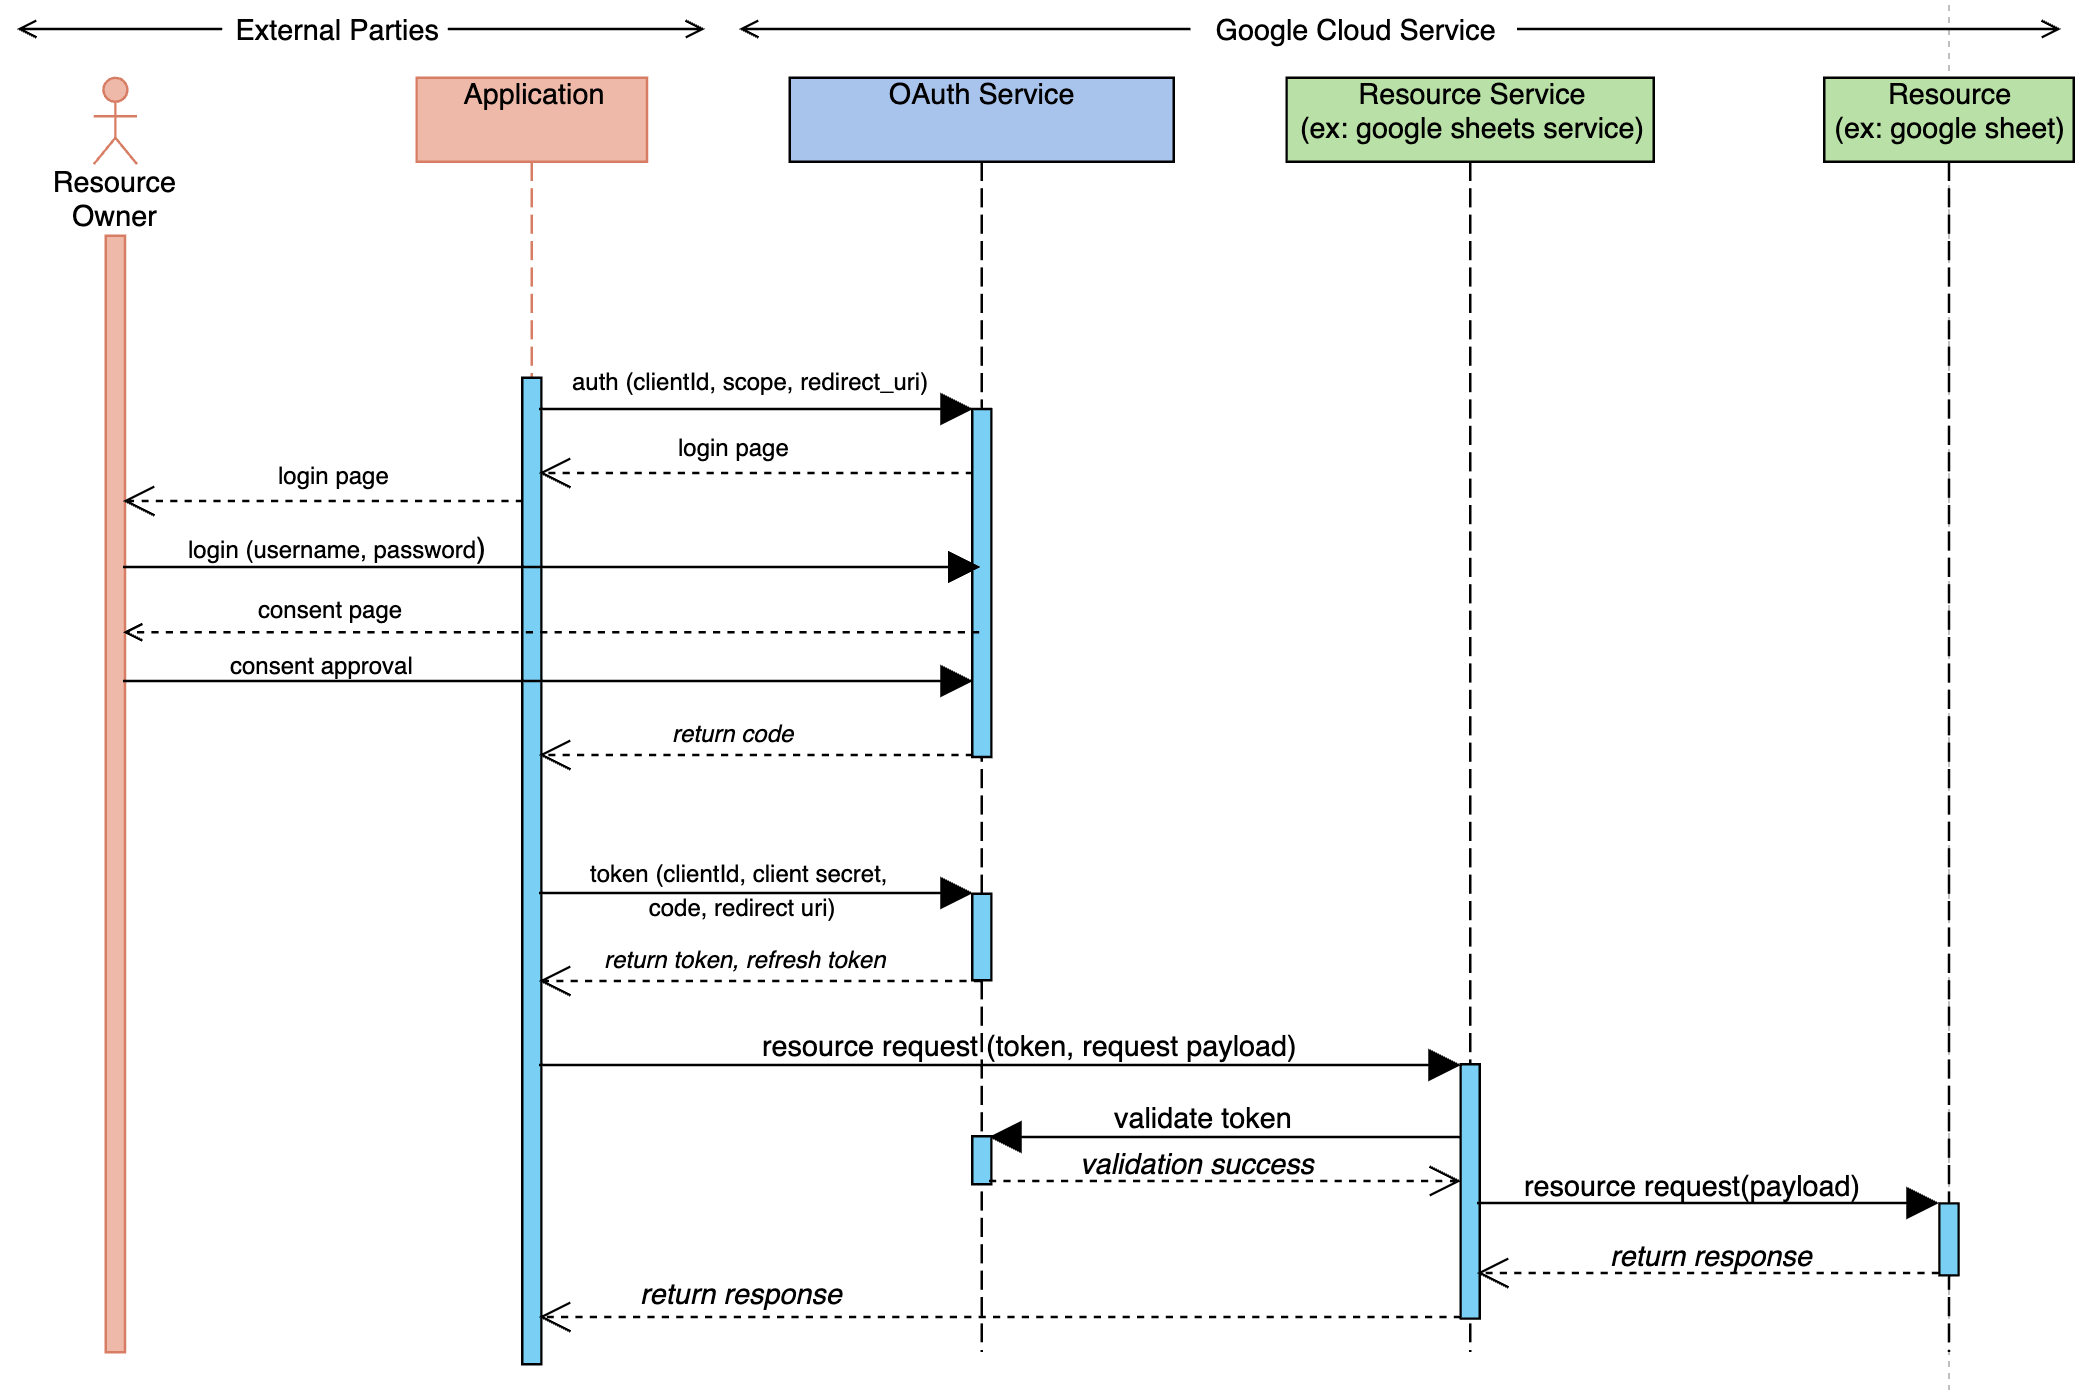
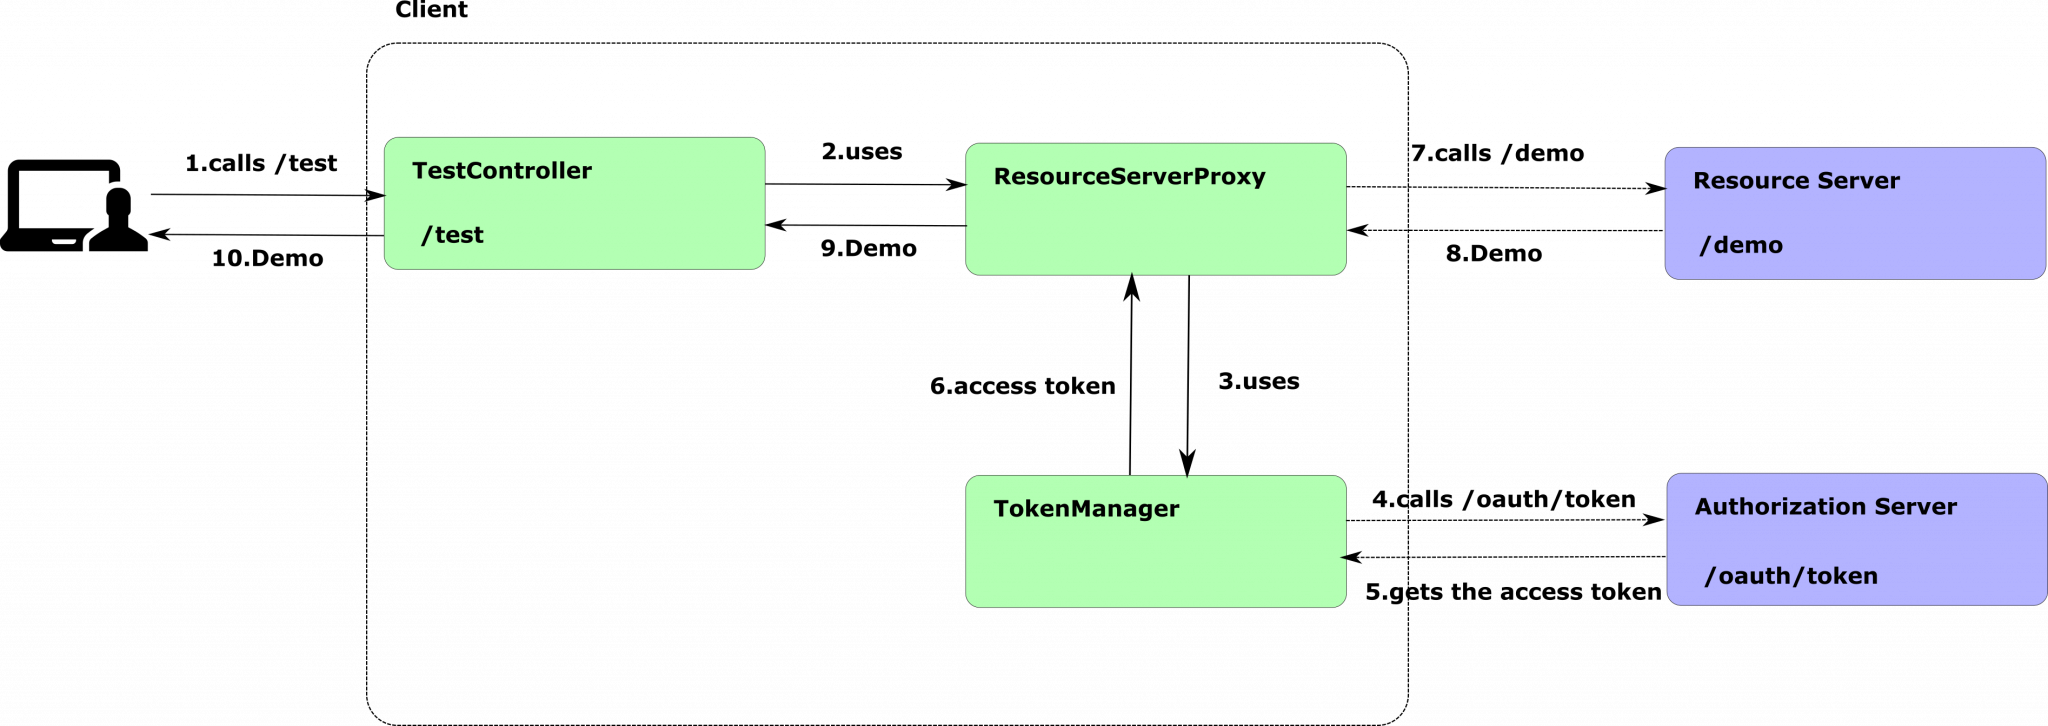
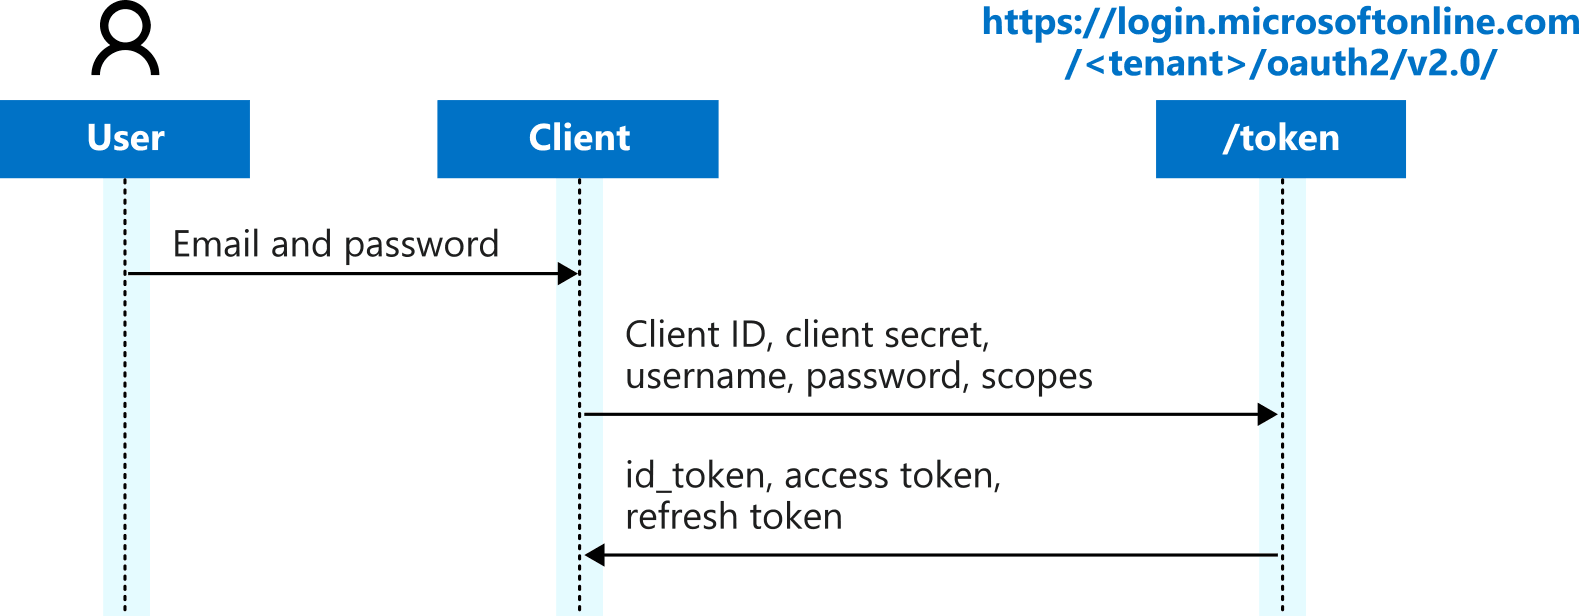
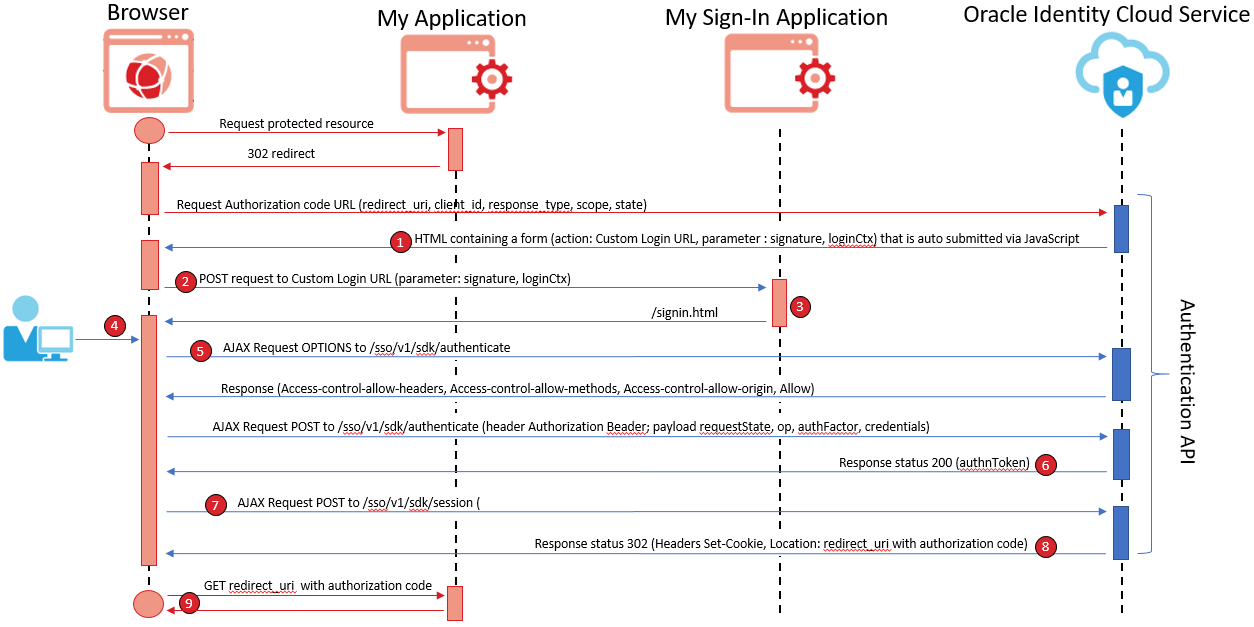
Here’s a sequence diagram summarising the key steps:
![]()
How Do We Set up Google OAuth?
To start, we’ll need to complete some prerequisites. You should have:
- A server running Node.js with a database (this can be a simple SQLite database).
- Views for the sign-in and sign-out pages.
- A Google account for testing your app.
First, let’s create a new folder called auth to start organizing our code. In this folder, we’ll create three files:
- package.json — Node.js use this to store information about our project.
- index.js — This is used to start the server. Here, we’ll initialize the server with our database and create a route for handling pages.
- auth.js — This file will store the user’s credentials for Google. Do not share this information!
Step 1: Initializing Our Application’s Environment
First, we’ll need to create a service account keypair from the Google Cloud Platform. You might have to provide details about yourself to get the service account, but generally, it’ll be a new account with an API key.
After that, initialize a new app on your terminal and fill in the relevant information about the app.
Step 2: Install Our App Dependencies
Now that our app is ready, let’s quickly install dependencies pertinent to Google-OAuth integration.
After that, set up nodemon to run and watch the server for changes.
Step 3: Hooking Up the Server to Google
Now that we’ve got our application up and running, it’s time to connect it with Google. To do this,add your credentials for signing in to your Google account to auth.js. Here is an example of what an auth.js file for testing with localhost may look like:
You can visit the Google developer console to obtain the Google credentials.
Step 4: Set Up Relevant Endpoints
Now that we’re all set up, we generate endpoints to ensure that we’re using Google’s OAuth 2.0. We’ll be using the Express framework for our server, allowing us to define new routes and easily create responses to those routes. First, we’ll create a base URL that gives us a link to sign in using Google.
The second endpoint leverages Google authentication with the help of passport.
Finally, we’ll need to handle the callback, success, and failure URLs. The URLs handle a successful login, failure login, and logout. Additionally, to keep track of a user’s login status, we use isLoggedIn middleware.
When you click Log In with Google, the endpoints above will route you to the relevant page, depending on the success or failure of authentication. If successful, you’ll be directed to the success route, or you’ll be redirected to the failure route if unsuccessful.
Проверить правильность ввода учетных данных
Ошибка 28 «недействительные учетные данные или отключен протокол IMAP» может возникать из-за неправильных учетных данных, которые вы ввели при настройке электронной почты на устройстве.
Проверьте следующие учетные данные:
Имя пользователя: Убедитесь, что вы правильно ввели имя пользователя для вашего электронного адреса. Учтите, что имена пользователей чувствительны к регистру, поэтому проверьте, что вы используете правильный регистр для каждой буквы.
Пароль: Убедитесь, что вы ввели правильный пароль для своей учетной записи. Проверьте, что вы не сделали опечатку при вводе пароля, и учтите, что пароли тоже чувствительны к регистру.
Сервер входящей почты (IMAP): Убедитесь, что вы правильно ввели адрес сервера входящей почты IMAP
Обратите внимание, что это может быть отличаться для разных почтовых провайдеров, поэтому проверьте информацию на их сайте или свяжитесь с технической поддержкой для получения правильных настроек
Порт IMAP: Убедитесь, что вы используете правильный порт IMAP для своего почтового провайдера. Обычно используется порт 993, но это также может отличаться в зависимости от провайдера. Проверьте настройки вашего провайдера или обратитесь за помощью к их технической поддержке.
Если после проверки всех учетных данных ошибка 28 все еще возникает, попробуйте восстановить пароль для своей учетной записи или свяжитесь с технической поддержкой вашего почтового провайдера для получения дополнительной помощи.
Diagnosing The Problem
Check for Directory Configuration bind user credential is incorrect
1. Check the ping page and confirm that CE has started successfully with no errors.

2. Attempt to login through FEM with a valid user. If the login fails with a LDAP error 49, at least one of the directory configuration bind user credential is incorrect.
Check for bootstrap user credential is incorrect
1. Check the ping page and confirm that CE has started, but the ping page should give a LDAP error 49.
2. Attempt to login through FEM with a valid user. If the login fails with a LDAP error 49, the bootstrap user crenential is incorrect.
Debugging the error
As discussed in previous posts, the error page we saw above is a custom error page and does not reveal much helpful information for administrators. If you enable the detailed errors, you will see an error page with much detailed information, as shown in the following screenshot:
![]()
Error message 401.3 – You do not have permission to view this directory or page using the credentials you supplied (access denied due to Access Control Lists)
The detailed error gave you the HTTP 401.3 status code, which will guide you in checking the access control permissions on the file system. Make sure that the user who is set as the application pool identity has the read and execute permissions on the website’s root directory. If the error persists, the most likely cause is incorrect anonymous user identity. The following screenshot shows the problematic scenario:
![]()
Mismatched application pool identity and anonymous authentication identity user in IIS
The screenshot shows a mismatched application pool identity and anonymous authentication identity on the website, which is causing the error. For a website to work properly, both should be the same.
Понятие «invalid credentials»
Обычно invalid credentials возникают при попытке входа на веб-сайт, в приложение или в систему, требующую аутентификации с использованием логина и пароля. Ошибка может возникнуть при неправильно введенном логине или пароле, а также в случае отсутствия учетной записи пользователя в системе.
Сообщение «invalid credentials» может быть полезным для пользователей, поскольку оно ясно указывает на причину неудачной попытки входа. Оно предоставляет информацию о том, что нужно проверить или изменить введенные данные для решения проблемы.
Разработчики и администраторы систем обычно используют ошибку «invalid credentials» для обеспечения безопасности. С помощью нее можно предотвратить несанкционированный доступ или взлом учетных записей, поскольку неправильные учетные данные будут блокированы.
Чтобы решить проблему с invalid credentials, пользователь должен внимательно проверить правильность введенных данных, в том числе наличие ошибок в регистре или дополнительных пробелов. Также может быть полезным сбросить пароль или зарегистрироваться в системе снова в случае, если аккаунт был удален или заблокирован.
Использование правильных и безопасных учетных данных — ключевой фактор для успешной аутентификации и доступа к различным системам и сервисам.
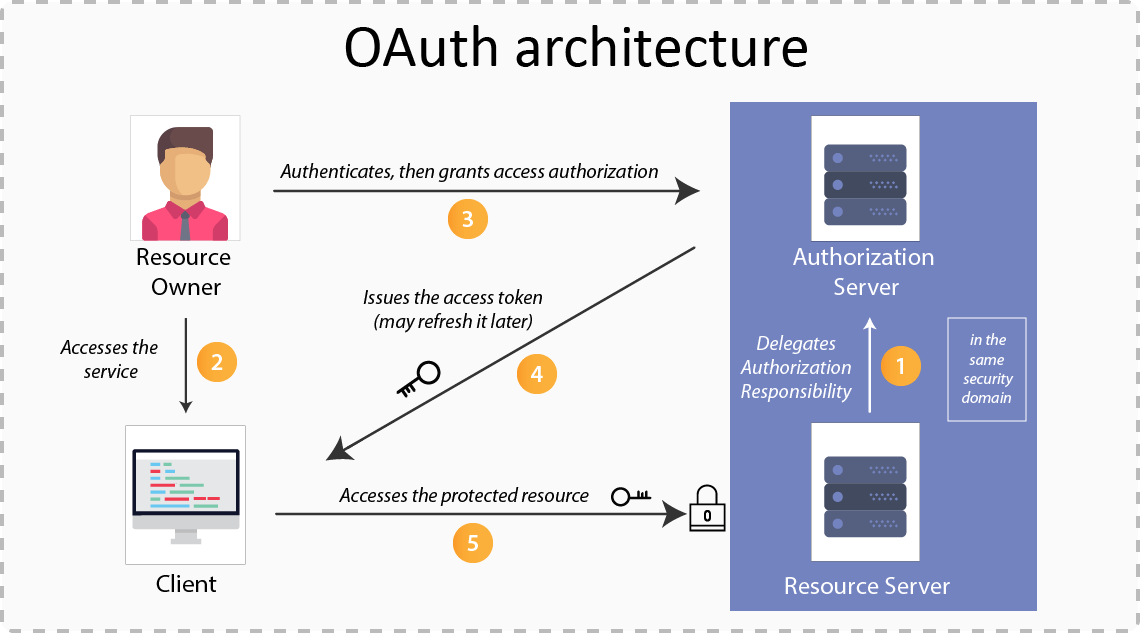
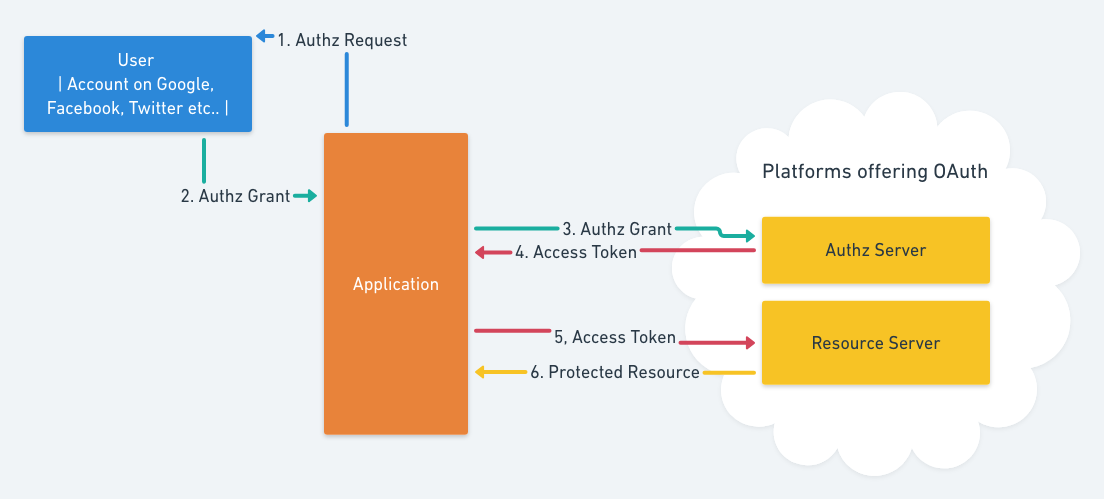
Authorization Grant
In the Abstract Protocol Flow outlined previously, the first four steps cover obtaining an authorization grant and access token. The authorization grant type depends on the method used by the application to request authorization, and the grant types supported by the API. OAuth 2 defines three primary grant types, each of which is useful in different cases:
- Authorization Code: used with server-side Applications
- Client Credentials: used with Applications that have API access
- Device Code: used for devices that lack browsers or have input limitations
Warning: The OAuth framework specifies two additional grant types: the Implicit Flow type and the Password Grant type. However, these grant types are both considered insecure, and are no longer recommended for use.
Now we will describe grant types in more detail, their use cases and flows, in the following sections.
Code Custom OAuth User and OAuth User Service Classes
package net.codejava;

import java.util.Collection;
import java.util.Map;

import org.springframework.security.core.GrantedAuthority;
import org.springframework.security.oauth2.core.user.OAuth2User;

public class CustomOAuth2User implements OAuth2User {

	private OAuth2User oauth2User;

	public CustomOAuth2User(OAuth2User oauth2User) {
		this.oauth2User = oauth2User;
	}

	@Override
	public Map<String, Object> getAttributes() {
		return oauth2User.getAttributes();
	}

	@Override
	public Collection<? extends GrantedAuthority> getAuthorities() {
		return oauth2User.getAuthorities();
	}

	@Override
	public String getName() {
		return oauth2User.getAttribute("name");
	}

	public String getEmail() {
		return oauth2User.<String>getAttribute("email");
	}
}
package net.codejava;

import org.springframework.security.oauth2.client.userinfo.DefaultOAuth2UserService;
import org.springframework.security.oauth2.client.userinfo.OAuth2UserRequest;
import org.springframework.security.oauth2.core.OAuth2AuthenticationException;
import org.springframework.security.oauth2.core.user.OAuth2User;
import org.springframework.stereotype.Service;

@Service
public class CustomOAuth2UserService extends DefaultOAuth2UserService  {

	@Override
	public OAuth2User loadUser(OAuth2UserRequest userRequest) throws OAuth2AuthenticationException {
		OAuth2User user =  super.loadUser(userRequest);
		return new CustomOAuth2User(user);
	}

}
loadUser()CustomOAuth2User
Why can’t I log in to Vanguard?
There are several reasons that you may be having difficulty logging into Vanguard.
The first reason is that you may not have your username and/or password correctly entered. Make sure you’re entering your username and password in correctly, as Vanguard is case sensitive. Additionally, if you have caps lock on, your username and password may not be accepted.
The second reason could be that you have not yet set up your online account. If you do not have an online account with Vanguard, you’ll need to set one up in order to log in.
Another possible reason is that your account may be locked or suspended. If you suspect this is the case, contact Vanguard’s customer service or account support team.
The last possibility is that you may not have an account with Vanguard. If this is the case, you will need to set one up in order to gain access.
If you are still having difficulty logging into your Vanguard account, contact their customer service or account support team. They are always happy to help.