

Two-Factor Authentication
![]()
If you’re having trouble with security questions, try another option called two-factor authentication. Setting up two-factor authentication means that a login code gets sent to the devices you’re already signed in to.
Two-factor authentication gets done using any portable Apple device that supports iOS 9 or later, so even if you have an older iPhone or iPad that is still logged in to your account, connect to wifi and complete the following steps:
- Visit “Settings” on your device.
- Tap on your name at the top (this is where your Apple ID info is located).
- Choose “Password & Security.”
- Tap on “Two-Factor Authentication.”
- Toggle the option to “On.”
If you’re already past this point and can’t log in because you no longer have the phone number, there are a few things you can try.
- Get the code sent to a different Apple device that you’re logged in to.
- Contact Apple (1-800-My-Apple) or visit the website.
There is a waiting period and a lengthy verification process to get your account back. You may be asked to confirm the credit card you have on file, your security questions, and even the date you purchased an Apple product.
Подключитесь к другому серверу VPN
Если вы пытаетесь подключиться, возможно, сервер VPN, который вы используете, слишком медленный или имеет слишком много пользователей . Большинство приложений VPN позволяют выбирать между несколькими серверами в каждом доступном месте. Попробуйте перейти на другой и посмотреть, поможет ли это.
Помните, что чем ближе вы находитесь к серверу, тем быстрее он будет . Например, если вы находитесь в Европе и вам необходимо подключиться к американскому серверу, серверы на восточном побережье должны быть быстрее, чем на западе.
Если вы используете VPN на своем маршрутизаторе, а не через клиент на вашем устройстве, переключение между серверами более сложное . Способ зависит от вашего роутера и провайдера VPN. Если вы не уверены, как это сделать, проверьте документацию для вашего маршрутизатора и VPN .
Настраиваем почту Gmail в The Bat!
Чтобы работать с электронной корреспонденцией Gmail в The Bat!, необходимо добавить соответствующий почтовый ящик в программу и правильно его настроить. И начать стоит с определения параметров непосредственно на стороне сервиса.
Выбираем протокол
Отличительная особенность почтового сервиса от Google – гибкая работа с обоими протоколами – POP и IMAP. При загрузке писем с помощью POP здесь имеется возможность оставлять копии оных на сервере или же отмечать сообщения прочитанными. Это позволяет не просто использовать ящик на нескольких устройствах, но и параллельно задействовать другой протокол – IMAP.
Именно последний используется для получения и отправки электронной корреспонденции в Gmail по умолчанию. Чтобы включить протокол POP, нужно воспользоваться разделом настроек в веб-версии почтового сервиса.
![]()
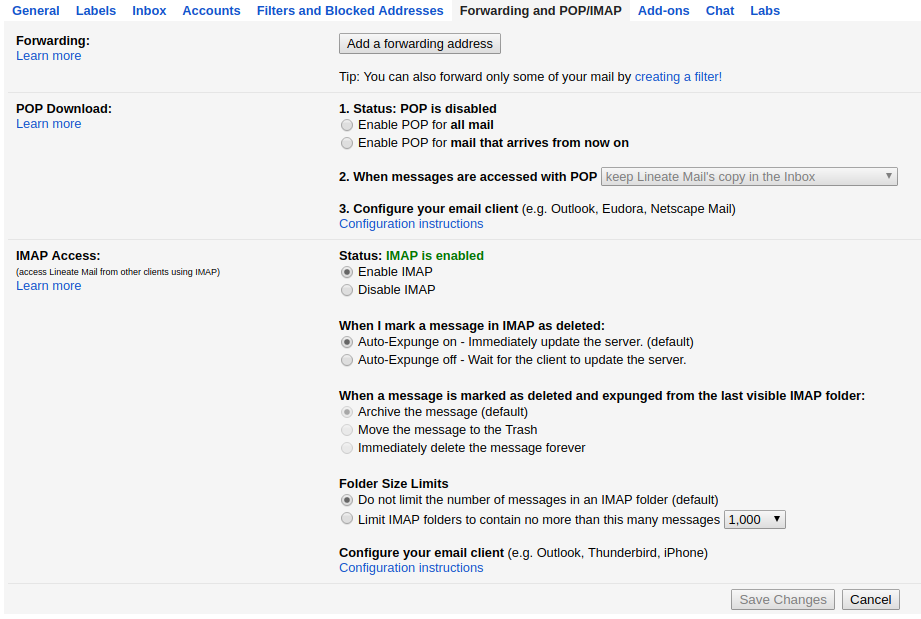
В «Настройках» перейдите во вкладку «Пересылка и POP/IMAP».
![]()
Здесь для активации POP в группе параметров «Доступ по протоколу» можно включить соответствующий протокол для всех писем или же лишь тех, что будут получены с момента сохранения выбранных настроек.
Также при необходимости здесь можно подробно сконфигурировать работу как IMAP-сервера электронной корреспонденции, так и работающего по протоколу POP. К примеру, можно деактивировать используемую по умолчанию функцию автоматического стирания писем и непосредственно настроить удаление сообщений.
Изменяем конфигурацию клиента
Итак, перейдем к непосредственной настройке нашей почтовой программы. Наша задача — добавить новый ящик в клиент, указав конкретные параметры, предоставленные имейл-сервисом.
-
Если ранее вы уже подключали почтовые ящики к The Bat!, то для добавления аккаунта Gmail в клиент перейдите в раздел «Ящик» панели меню.Затем в выпадающем списке выберите первый пункт — «Новый почтовый ящик…».
- После этого откроется новое окно, в котором вам необходимо указать ряд данных, идентифицирующих вас и ваш почтовый ящик.
Сначала в первое поле введите свое имя в том формате, в котором желаете, чтобы оно отображалось у адресатов ваших писем. Затем укажите свой почтовый адрес в сервисе Gmail. Вписать его нужно полностью, вместе со знаком «@» и доменом.Далее в выпадающем списке пункта «Протокол» выберите вариант «IMAP или POP». Именно после этого станет доступным поле «Пароль», куда и следует ввести соответствующую комбинацию символов.Чтобы перейти к дальнейшей настройке ящика Gmail в The Bat!, нажмите «Далее». - Перед вами откроется вкладка с более конкретными параметрами доступа к серверу почты «Корпорации Добра».
В первом блоке отметьте протокол, с которым желаете работать — IMAP или POP. В зависимости от данного выбора будет автоматически установлен «Адрес сервера» и «Порт». Пункт «Соединение» же стоит оставить как «Безопасное на спец. порт (TLS)». Ну а поля «Имя пользователя» и «Пароль», если на начальном этапе настройки вы их заполнили верно, менять не нужно. Еще раз бегло все проверьте и нажмите «Далее». - На новой вкладке вам будут представлены настройки исходящей почты.
Менять здесь ничего не нужно — по умолчанию уже установлены необходимые значения. Главное — проследите, чтобы был отмечен чекбокс «Мой сервер SMTP требует аутентификации». В общем, все должно быть, как на скриншоте выше.Чтобы перейти к завершению настройки The Bat!, кликните на все ту же кнопку «Далее» внизу. - Собственно, теперь все, что нам нужно — кликнуть на кнопку «Готово» на новой вкладке.
Конечно, можно изменить отображаемое в дереве папок имя ящика или же расположение мэйлбокса непосредственно в памяти компьютера. Но лучше оставить все как есть — работать таким образом с несколькими ящиками в одной программе удобнее всего. - По завершении настройки почты Gmail в The Bat!, строка журнала работы программы в нижней части интерфейса клиента должна отобразить сообщение вроде «Аутентификация на IMAP/POP-сервере успешно завершена…».
Если же в итоге получить доступ к вашему имейл-аккаунту программа так и не смогла, перейдите в «Ящик» — «Свойства почтового ящика» (или «Shift+Ctrl+P») и еще раз проверьте на правильность все параметры, устранив ошибки ввода.
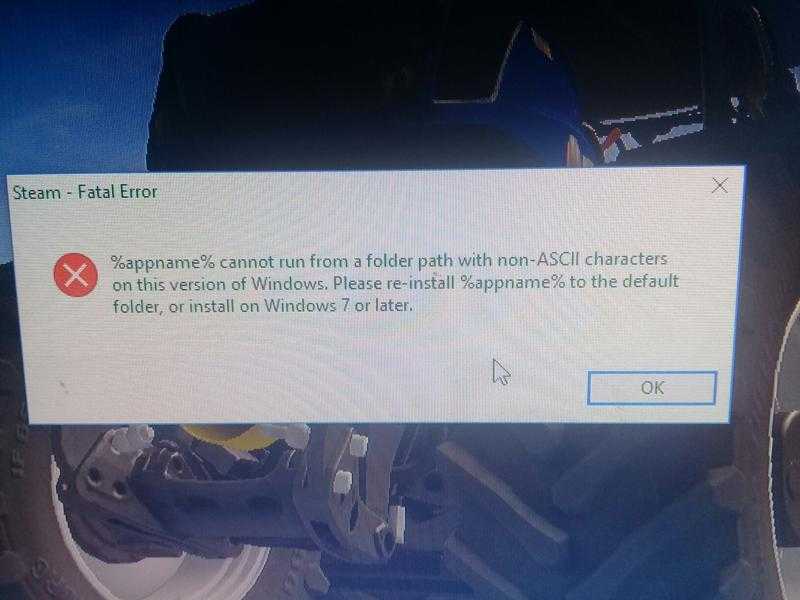
What does Invalid credentials mean on Steam?
Steam Guard is an authenticator app that Steam helps you safeguard your Steam account. It provides an additional layer of security to the account. However, if Steam Guard is not working properly, you may get the Invalid credentials supplied error. Here are some of the causes of this error:
- You have just changed your account – If you have reset your password or changed your account, make sure you input the right credentials into the app.
- Steam Guard is malfunctioning – Every time you try to log in to your account, Steam Guard will generate a code on your smartphone so you need to enter this code on the Steam login page in order to access your account. It only lasts for 30 seconds or you will need to generate another one.
- The Steam app is not updated – The Invalid credentials supplied in Steam may also be caused by the fact that your Steam app is not updated.
Let us check out the solutions you can apply to fix the Invalid credentials supplied in Steam issue.
Contacting Apple Support
is exceptionally helpful, but they can only do so much for you. If you lose your password, support requires the answers to your security questions to gain access to your account. If you cannot remember those answers, they will put your account into an account recovery status.
Apple uses a blind system to help maintain security. The support operator will only see the questions and have empty boxes to input the answer. They do not know the answer and do not have access to those answers. Nobody does as the system encrypts them. You give them your security answer, they type it into the box, and the system will tell them whether it is correct or not.
Account recovery places your Apple ID on hold until it is properly verified. You can provide certain information to speed up the process (like the credit card on file).
Why Canned Responses Are Useful
As detailed by the definition in the image below, canned responses can help you improve two important customer service attributes: speed and consistency.
![]()
They can also help guarantee your customer service reps are talking about your products and services accurately.
For example, let’s say a customer is asking about the status of their order. Your reps can easily pull language from a bank of canned responses based on where their product is in the queue.
If it’s still in the order processing phase, the canned response could look something like this:
We’ll get into more canned response examples in a bit. But first, let’s review some best practices for how to create a good one.

![[100%fixed] an error occurred. if this issue persists please contact us fixed?](https://asdisel.ru/wp-content/uploads/e/5/8/e5892b2ca1fed419f11ddb0c1e98a1d4.jpeg)
![[100%fixed] an error occurred. if this issue persists please contact us fixed? - tech2wire](https://asdisel.ru/wp-content/uploads/c/7/f/c7fefb96ccb24f64a4bfb01176664f60.jpeg)

Почему появилось сообщение «An error occurred. If this issue persists…»
ChatGPT пока что находится на стадии тестирования, поэтому иногда с этим искусственным интеллектом возникают проблемы, из-за которых и возникает сообщение: «An error occurred. If this issue persists please contact us through our help center at help.openai.com», что делать, расскажем далее.
А сейчас остановимся на основных причинах, из-за которых могла произойти ошибка:
- Проблемы в работе серверов OpenAI;
- Ограничения в скорости API;
- Перегрузка серверов ChatGPT, например, большое количество запросов от пользователей;
- Был введён слишком сложный запрос;
- Введённый запрос был неправильно отформатирован.
![]() Ошибка в работе ChatGPT
Ошибка в работе ChatGPT
How IIS authentication works
The error itself indicates that it is caused by a failure to authorize access. Someone who is a beginner in IIS could find the error description «you do not have permission to view this directory or page using the credentials that you supplied» slightly confusing. If you think from an end user’s perspective, you might be wondering when you supplied any credentials while accessing the website. Well, this happened automatically on the server side. By default, every website hosted on IIS has anonymous authentication enabled.
If you open the IIS Manager, select your website, and then double-click Authentication under the IIS section in the Features view, you will see the various authentication modes (such as basic authentication, forms authentication, anonymous authentication, etc.) that are supported by IIS.
![]()
Viewing various authentication modes supported by a website in IIS
Each website has to have at least one authentication mode enabled and, by default, Anonymous Authentication mode enabled. Authentication is a mechanism that is used to verify the visitor’s identity to your website. See the following screenshot for reference:
![]()
Default authentication modes supported by a website in IIS
Anonymous authentication allows visitors to access the public content of your website anonymously without having to supply any credentials. If you don’t want to use it, select the authentication mode, and then click Disable in the Actions pane on the right. To view or modify which credentials are used by anonymous authentication, click the Edit link on the right. You will see two options, as shown in the following screenshot:
![]()
View or modify the credentials used by anonymous authentication in IIS
By default, each website is set to use the IUSR user for anonymous user identity, which is a built-in account starting with IIS version 7. If you are using a custom username as the application pool identity, make sure you select the application pool identity option here. This way, you don’t have to worry about updating the user’s password in the website configuration over and over when the user’s password is changed.
How to prevent Instagram login issues?
If you can solve the problem, you should look for ways to prevent it from happening again. So here are some ways you can no longer get the Can’t log in to Instagram error message. In addition, try to remember all the methods you have tried before.
Link Your Instagram and Facebook Accounts
If you have not yet connected your Instagram account to Facebook, you can do so now. You must first have a Facebook account. If you already have an account that does not exist, you should log in to Facebook and create an account if you do not have one.
After creating an Instagram account (or if you have an account), you can connect it to your Instagram account via the following.
- Once your Instagram account is open, click on the hamburger menu at the top.
- Then click on Settings at the bottom of the menu.
- Then under the Facebook option, open the Account Center menu.
- From here, you can open the Logging in across accounts option and then click on Add accounts.
- Then enter your Facebook account information and then click Continue.
So far, you have been able to connect your Facebook account to Instagram. But if you could not log in to Instagram later, how can you solve the problem by logging in to Facebook? Follow the steps below to do this.
- First, open the Instagram website through your browser. It does not matter which browser.
- Then log in to Instagram with your account.
- From this section, go to Profile and open the menu hamburger icon and go to the Account section by entering Settings.
- At the bottom of the Accounts section, you will see the Linked Accounts option. Separate any Facebook account from Instagram here.
- Go to Facebook again and create a new account. Of course, a new account can only complete the basic information, and there is no need for photos and other items.
- Log in to your Instagram account again through another device.
- Now connect your Instagram account with the Facebook account you created.
- Then on the primary device, clear the cache of the Instagram app
- Restart the Instagram app.
- Finally, log in to Instagram with your Facebook account. On the Instagram login page, you must click the Login with a Facebook Account option.
Conclusion
In this article, we reviewed ten ways to solve can’t log into your Instagram account to see how you can easily log in to your account. If you have ever encountered such a problem and were able to solve the problem through this article, be sure to send your comments on how to solve the problem. You can create a fake Instagram post without installing any app on your mobile using fake Instagram post generator by FakeInfo.
Finally, if you are curious to learn how to fix other Instagram issues you can read Instamber blogs! feel free to ask your question in the comment section.
Debugging the error
As discussed in previous posts, the error page we saw above is a custom error page and does not reveal much helpful information for administrators. If you enable the detailed errors, you will see an error page with much detailed information, as shown in the following screenshot:
![]()
Error message 401.3 – You do not have permission to view this directory or page using the credentials you supplied (access denied due to Access Control Lists)
The detailed error gave you the HTTP 401.3 status code, which will guide you in checking the access control permissions on the file system. Make sure that the user who is set as the application pool identity has the read and execute permissions on the website’s root directory. If the error persists, the most likely cause is incorrect anonymous user identity. The following screenshot shows the problematic scenario:
![]()
Mismatched application pool identity and anonymous authentication identity user in IIS
The screenshot shows a mismatched application pool identity and anonymous authentication identity on the website, which is causing the error. For a website to work properly, both should be the same.
How To Solve LDAP Error Code 49?
To solve the LDAP error code 49, the user account’s password needs to be changed that is listed in the vmdird_syslog.log file. You might have to reset the password in both vCenter Server and in Windows installed vCenter Server to get rid of this error.
– In Vcenter Server
To change the password in the vCenter Server appliance, follow the given guidelines properly
- First, you must create a snapshot of the vCneter Server and the Platform Services Controller.
- After that, you will connect with the Platform Services Controller with the root credentials and SSH sessions.
- Then you need to run the command below to enable access to the Bash shell: set -enable true
- When you do that, you need to type shell and clock on Enter.
- Then, you need to run a command given below so that you can open the vdcadmintool
| /usr/lib/vmware-vmdir/bin/vdcadmintool |
You will then see the following options
|
Please select:
0. exit 1. Test LDAP connectivity 2. Force start replication cycle 3. Reset account password 4. Set log level and mask 5. Set vmdir state |
You should select option three from the list given above. Then you will enter the user account listed in the file that says vmdird-syslog.log.


After that, you need to make a note of the autogenerated password. Then Connect to the vCenter Server Appliance with the root credentials and the SSH servers, after which you should run the command below to access the Bash Shell.
| Shell.set -enable true. |
After that, type Shell and then click on Enter. When you are done with the steps given above, you need to run the commands given below so that you will get the password updated.
|
/opt/likewise/bin/lwregshell
cd HKEY_THIS_MACHINE\services\vmdir\ set_value dcAccountPassword “new password” quit |
At last, you will need to restart the vCenter Server Appliance services, and you’ll be all set to go after that
– Windows Installed Vcenter Server
To change the password in the Windows-installed vCenter Server, follow the given guidelines properly:![]()
- First, you must create a snapshot of the vCenter Server and the Platform Services Controller.
- On the Platform Services Controller, you will open the elevated command prompt.
- Afterward, you will run the command given below.
| %VMWARE_CIS_HOME%\vmdird\vdcadmintool.exe |
Then you see the following options
|
Please select:
0. exit 1. Test LDAP connectivity 2. Force start replication cycle 3. Reset account password 4. Set log level and mask 5. Set vmdir state |
- From the list of options given above, you will pick option 3.
- Now you will enter the account listed in the file that says vmdir.log.
- You will then have to make a note of the password generated.
- You will then connect to the vCenter Server and then open Regedit.
- You will then navigate to the location: HLKM\System\CurrentControlset\Services\VMwareDirectoryService\
- Afterward, you need to update the password for the key dcAccountPassword.
- When you are done with the changes made, save them and exit.
- Remember to restart the vCenter server services, and you will be ready.
Sign Out from iTunes & App Store
One potential reason this glitch occurs is if the phone has been inactive for a while still being connected to iTunes. This could end up causing an Auth token issue that can be fixed by signing out of both the App Store and iTunes.
Several affected users that were also dealing with this particular issue have confirmed that the problem was resolved simply by signing out from iTunes & App Store, then back again.
If you’re looking for instructions on how to do this, follow the steps below:
- Launch the Settings app, and open both iTunes & App Store – even if you have a problem while signing in to iCloud.
- From iTunes, tap on your Apple ID at the top, and a pop-up window will appear.
- Next, tap on the sign out from the window that just appeared.
- Repeat step 2 and step 3 with the Apple Store too.
- Sign back in with your Apple ID, then retry the backup operation and see if the problem is now fixed.
If the same problem is still occurring, move down to the next method below.
How to fix AADSTS50059?
Table of Contents
I encountered this error while trying to reload a page with some JavaScript that authenticates against Graph API. It completely blocks the functionality, as it redirects the user to the login page, but instead of successfully logging in (and perhaps redirecting back), it fails with an error.
Luckily, at least in my case, this was easily fixed! Your error might look something like this:
Okay – so the error claims Azure AD fails to recognize your tenant, as the request or provided credentials didn’t provide that.
… But is that even true?
The URL of the login page will look something like this:
So.. Wait a minute. The login URL actually has all the info about the tenant and everything! You should be able to log in with that. What’s wrong, then?
The issue is, that you’ve already got login information on your machine – just not the correct one for this tenant! It’s all cached in the Local Storage, and the info conflicts with what you have in the URL. So the whole login process is trying to implicitly use the wrong cached credentials to log in to the tenant automatically.
Используйте другой протокол VPN
В большинстве VPN вы можете выбрать, какой протокол IP использовать . Наиболее распространенными являются TCP (протокол управления передачей) и UDP (протокол пользовательских дейтаграмм). Основное отличие состоит в том, что TCP включает исправление ошибок , то есть он отправляет все, что повреждено или не получено из-за проблем с соединением. Поскольку UDP этого не делает, он быстрее, но может быть менее надежным.
Переключение между протоколами может устранить ошибку «VPN Authentication Failed» , ускоряя ваше соединение, особенно если вы переходите с TCP на UDP . Вы найдете эту опцию в настройках вашего VPN-приложения
Обратите внимание, что качество вашего соединения может ухудшиться, если вы переключите протоколы
Причины возникновения данной ошибки и ее последствия
Ошибку Imap код 28: Invalid Credentials Failure (неверные учетные данные) можно столкнуться во время работы с почтовыми клиентами или веб-приложениями, которые применяют протокол Imap для доступа к почтовому ящику.
Данная ошибка может возникать по нескольким причинам:
- Неверный логин или пароль. Одной из наиболее распространенных причин является неправильно введенный логин или пароль при попытке авторизации на сервере. В таком случае, вам необходимо проверить правильность введенных данных и повторить попытку входа.
- Изменение учетных данных. Если вы изменили пароль или логин для доступа к почтовому ящику, то старые данные, возможно, уже не действительны. В таком случае, вам необходимо обновить учетные данные в настройках вашего почтового клиента или веб-приложения.
- Проблемы с сервером. Ошибка Imap код 28 также может быть вызвана проблемами на сервере или сети. В таком случае, вам стоит проверить статус сервера или обратиться за помощью в службу поддержки.
Последствия ошибки Imap код 28 могут быть различными:
- Невозможность получить доступ к почтовому ящику. В случае ошибки Invalid Credentials Failure вы не сможете прочитать или отправить новые сообщения. Это может привести к проблемам в коммуникации через электронную почту и пропуску важных сообщений.
- Потеря связи с почтовым клиентов или веб-приложением. В некоторых случаях, ошибка Imap код 28 может вызывать связанные проблемы с почтовым клиентом или веб-приложением. Некорректная работа приложения, сбои или зависания могут возникать из-за неверных учетных данных или проблем на сервере.
- Постоянные запросы на ввод учетных данных. Некоторые почтовые клиенты или веб-приложения могут приводить к постоянным запросам на ввод учетных данных при возникновении ошибки Invalid Credentials Failure. Это может быть раздражающим и мешать нормальной работе с электронной почтой.
Для решения проблемы с ошибкой Imap код 28 необходимо проверить правильность введенных учетных данных, обновить их в случае изменения, а также убедиться в отсутствии проблем на сервере или сети.
What is a 502 Bad Gateway Error?
The 502 Bad Gateway error specifically means that the server received an invalid response from an inbound server.
The Internet Engineering Task Force (IETF) defines the as:
Every time you visit a website your browser sends a request to a web server. The web server receives and processes the request, and then sends back the requested resources along with an HTTP header and HTTP status code. Typically an HTTP status code isn’t seen unless something goes wrong. It’s basically the servers way of notifying you that something has gone wrong, along with the code on how to diagnose it.

| Error Code | 502 Bad Gateway Error |
| Error Type | Server-side error |
| Error Variations | “502 Bad Gateway” “Error 502” “HTTP Error 502 – Bad Gateway” “502 Service Temporarily Overloaded” “502 Proxy Error” A blank white screen “502 Server Error: The server encountered a temporary error and could not complete your request” “HTTP 502” Temporary Error (502) 502. That’s an error 502 bad gateway Cloudflare Bad Gateway: The proxy server received an invalid response from an upstream server |
| Error Causes | Server overload Browser issues DNS issues Web host issues Firewall blocks Plugins and themes errors |
There are many different types of 500 status error codes (, , , , , , , etc.) which all have slightly different meanings.
These indicate that the request was accepted, but the server prevented the fulfillment of the request.
Check Out Our Video Guide to Fixing Different Types of 500 Errors